Crimson Desert Guide: How To Defeat The Crowcaller And Keep Your Sanity
If you are tired of watching a man in a feather suit dodge every single sword swing, you have finally come to the right place.
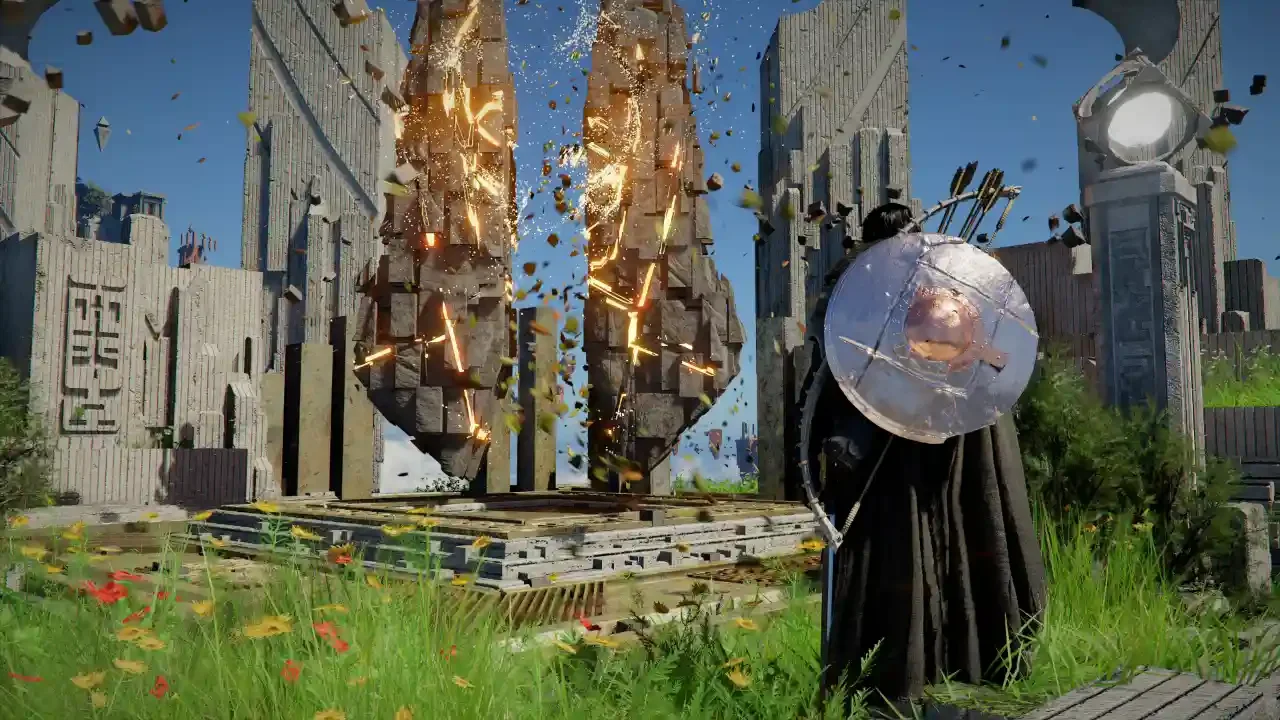
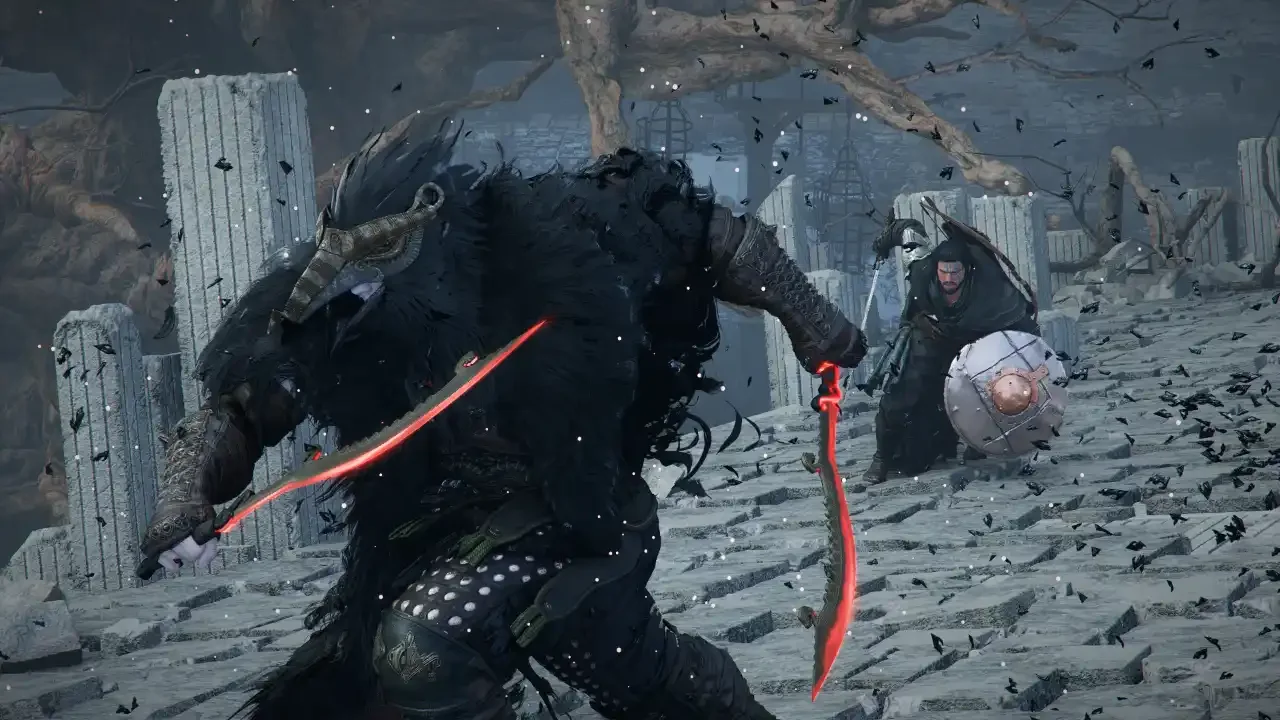
Reaching the end of Chapter 5 feels like a genuine accomplishment right up until you step foot into the Crow's Nest. You have climbed the Spire of Soaring, activated the Skybridge, and probably burned through a decent chunk of your supplies. Then the game throws the Crowcaller at you. This feather clad menace is easily one of the most frustrating encounters in the entire campaign. He refuses to fight you head on. He spends the majority of the battle flipping away from your attacks, draining your stamina, and chipping away at your health through your shield.
I have seen players absolutely lose their minds against this boss. I recently read a community thread where someone burned through 130 pieces of grilled meat and four Palmar Pills just to barely scrape by. You do not suck at the game if you are struggling here. The boss is designed to punish aggressive playstyles and test your patience.
I am going to walk you through exactly how to prepare your loadout, how to read his chaotic animations, and most importantly, how to use a massive environmental exploit to skip the hardest parts of the fight entirely.
Preparation And The Art Of Hoarding
You can memorize every single attack pattern in this game, but you will still die if you walk into this arena with an empty stomach. The Crowcaller hits hard, and his erratic movements mean you are inevitably going to take some stray hits.
You need to craft a comical amount of food. I highly recommend bringing at least 20 Hearty Grilled Meats into the arena. If you are running low on ingredients, take a detour and read my healing and cooking guide to stock up. You should also visit Ronnie over at the Greymane Camp to buy out his daily stock of Chewy Rice Cakes and porridge. You are going to face serious Spirit regeneration issues during this fight, and those specific foods are a lifesaver.
Your gear needs to be heavily optimized. Bring a one handed weapon like The Grove's Thorn or the Sword of the Lord, and pair it with the sturdiest shield you own. The Sydmon Kite Shield is a solid choice. You want to visit a blacksmith and push all of your weapon and armor upgrades to at least level five before starting the encounter. Finally, visit the Witchwoods and slot Abyss Cores into your armor that specifically boost your health regeneration and damage reduction.
The Nature's Grasp Exploit
I do not believe in fighting fair when a boss refuses to do the same. If you want to save yourself a massive headache, you can use the environment to instantly destroy the Crowcaller's health bar during two of the three phases.
Look around the arena. The Crow's Nest is littered with tall trees. When the fight starts, keep your shield up and intentionally kite the boss toward the timber. You want him to swing his swords and accidentally chop down the trees.
Once a tree falls, lock onto the severed trunk and activate your Nature's Grasp skill. Choose the slam option while aiming directly at the Crowcaller. Your character will violently sweep the massive log across the battlefield. If it connects, it will completely wipe out his entire health bar for that phase. It is an absolutely broken mechanic, and it is exactly the kind of dirty tactic I advocate for in my advanced exploits and cheese guide.
Just be careful. If the boss hits the fallen trunk a second time before you can grab it, the wood shatters into useless splinters.
Phase One: The Warm Up
If you miss the tree swing or simply want to fight him legitimately, phase one is a test of your defense. The Crowcaller relies heavily on a rapid red slash combo. Do not try to interrupt this. Hold your shield, absorb the impact, and wait for him to finish.
If you try to counterattack immediately, he will just perform a backflip and dodge your sword. You have to lock him down first. Use your Blinding Flash to temporarily stun him, or hit him with a Force Palm to deal heavy stagger damage. Once he is stunned, close the distance with a Stab or a Spinning Slash and follow up with a heavy grapple like the Lariat.
His signature move is the Aerial Roll. He will cross his dual swords, launch himself into the sky, perform a quick dash, and dive bomb straight through your guard. Do not panic roll when he goes up. Wait for him to finish the horizontal air dash, and dodge exactly when he turns to face you for the dive. He has a long recovery animation after he hits the dirt, giving you a massive window to deal damage.
Phase Two: Fighting The Camera
You cannot use the tree trunk exploit here. You have to survive phase two through pure mechanical skill.
This is arguably the toughest section of the entire game because the battlefield itself starts fighting you. The arena physically tilts, and the camera goes completely insane trying to track the boss. If your lock on breaks during the chaos, immediately hold your block button to snap the camera back to his location.
The Crowcaller becomes hyper aggressive. He extends his red slash combos and gains the ability to teleport around the slanted arena. More importantly, his Aerial Roll upgrades to a double dive. Do not drop your guard after you dodge the first strike. He will immediately launch back into the air and come down a second time.
Keep chewing your Spirit restoring food, rely heavily on your shield bash to interrupt his standard attacks, and use Force Palm to slow his movement speed whenever he gets too close.
Phase Three: Surviving The Onslaught
The final phase ramps the intensity up to absurd levels. The Crowcaller's Aerial Roll now triggers three consecutive dive bombs. You have to chain your dodges perfectly to survive the sequence.
He also introduces two incredibly dangerous new moves. The first is a fake out. He will charge his legs and leap into the air exactly like he is preparing for an Aerial Roll, but he will immediately cancel the animation into a backflip and unleash a dual sword wave. Keep your eyes locked on his character model so you do not dodge too early.
The second new attack is a one hit kill grapple. There is barely any startup animation for this grab, but you will see a distinct red flash right before he lunges. If you see the red light, roll backward immediately. If he catches you, the fight is over.
You can use the Nature's Grasp tree trunk exploit again in this phase to end the fight instantly. If there is no timber left, just stay patient. Play defensively, punish him after his third dive bomb, and eventually, he will stay down for good.
Defeating the Crowcaller wraps up the Chapter 5 storyline and rewards you with the Blackwing Leather Armor, the Blackwing Mask, and the Tauria Curved Sword. The sword actually comes with a unique Abyss Gear that fires spectral crows after every heavy attack. It is a fantastic weapon, and you can extract that specific gear to slot into your preferred blade if you want to keep your current build intact.